Creating a New Month’s Journal Page

The purpose of this post is primarily to help me be more efficient at the start of each month with the WordPress admin that needs doing to maintain this journal.
Part of the learning process is systematising things that one does routinely to achieve greater efficiency and to automate steps where possible.
As usual, if you have any comments or suggestions, please post them in the Comments box below or contact me through your favourite social media channel, listed to the right. Thank you.
New Page Creation
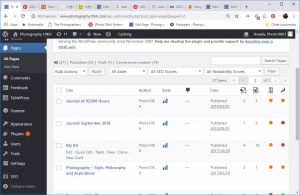
Find the previous month’s page in the Dashboard, called “Journal of 10,000 Hours”, and “Clone” to create a new draft page, actually an exact copy of the previous month’s page but with ” – DRAFT” added to the name.
Edit the New Draft Page
Find the new draft in the dashboard, click “Edit”, then make the following alterations to that page:
- Update the top graphic of the post, in the “Website Banners etc.” folder in Lightroom – include the new month. Save as a JPEG 1,000 px wide, and add to the page.
- Choose colours using the Adobe Colour Wheel/ Split Complementary and make a note of these for the next section, i.e., “Edit the Daily Post Reusable Block”
- Edit the page properties, expand tab on right-hand panel
- change the URL Slug to the new date, e.g., change from “-jan19” to “-feb19”
- update the featured image
- Update “Hour X at start of the month.”
- Delete all entries
- Save draft
Edit the Daily Post Reusable Block
Change the date text and colour:
- Go to the three dots menu at the top right of the window and select “Manage Patterns” in the penultimate section: “Tools”
- Select the Daily Post block
- Change month, e.g., from “4th May 2020” to “4th June 2020”
- Click Update
Change the code behind the block:
- Press <shift><option><command>M to bring up the code editor
- Change background colour or any other styling (in the html – sorry, only way to do this)
- Change the template id tag in the heading, e.g., change “id=May04” to “id=Jun04”
- <shift><option><command>M – back to visual editor – check it all looks OK
- Update
Add the First Entry for the New Page
- Navigate to the “Journal – Draft” page again and edit
- Insert the new Daily Post reusable block.
- Change to normal blocks
- Edit the first entry:
- increment month
- change “Hours …”
- enter some text as a first draft for the first entry for this month.
- Save draft
- Change the id=”X” code in the text tab for this entry:
- <Shift><Option><Command>M to view the page’s html (on Mac)
- Find and update the id=”X”
- Save draft
- <Shift><Option><Command>M to go back to the normal page editor
- Change the text and hyperlink at the bottom of the page to reference to the previous month
- Publish.
SEO for the Previous Month’s Page
- Look in the SEO spreadsheet, “SEO – The One I Want”, create and record a suitable Focus Keyword for the previous month
- Use this keyword in the next sub-section
Edit the Previous Month’s Page
- Change the Focus Keyword at the bottom of the page
- Go to the top of the page and change the title from “Journal of 10,000 Hours” to the month, e.g., “January 2019”.
- Delete the first paragraph and bullet points under “Purpose of this Journal” and replace with suitable text that include the Focus Keyword
- Change the “(Hour X at start of month.)” text with “Hours X to Y.”
- Update some of the images in the page to include the Focus Keyword in the alternative text
- Under the “Hours X to Y” line add a link to the new page, e.g., “(February 2019)” and edit the hypertext link so that it points to first entry, e.g., “https://www.photography10kh.com/journal-feb19#Feb01”
- Update.
Update the Menu Structure
From the top level of the dashboard, navigate to: Appearance – Menus
Make the new page the top of the new menu and structure the old menu items underneath it.
At the end of each year create a year page which merely contains links to all pages and is a placeholder in the menu structure.
New Year Admin
Copy the previous years page using the Clone option when viewing All Pages.
Edit the new draft page.
Add meta data.
Update all the hypertext links by each month.
Adjust the menu appropriately.
*** Update the filenames on all cameras. See note on 27th January 2023.